Saturday, 27 August 2022
ACS
Friday, 26 August 2022
old carts
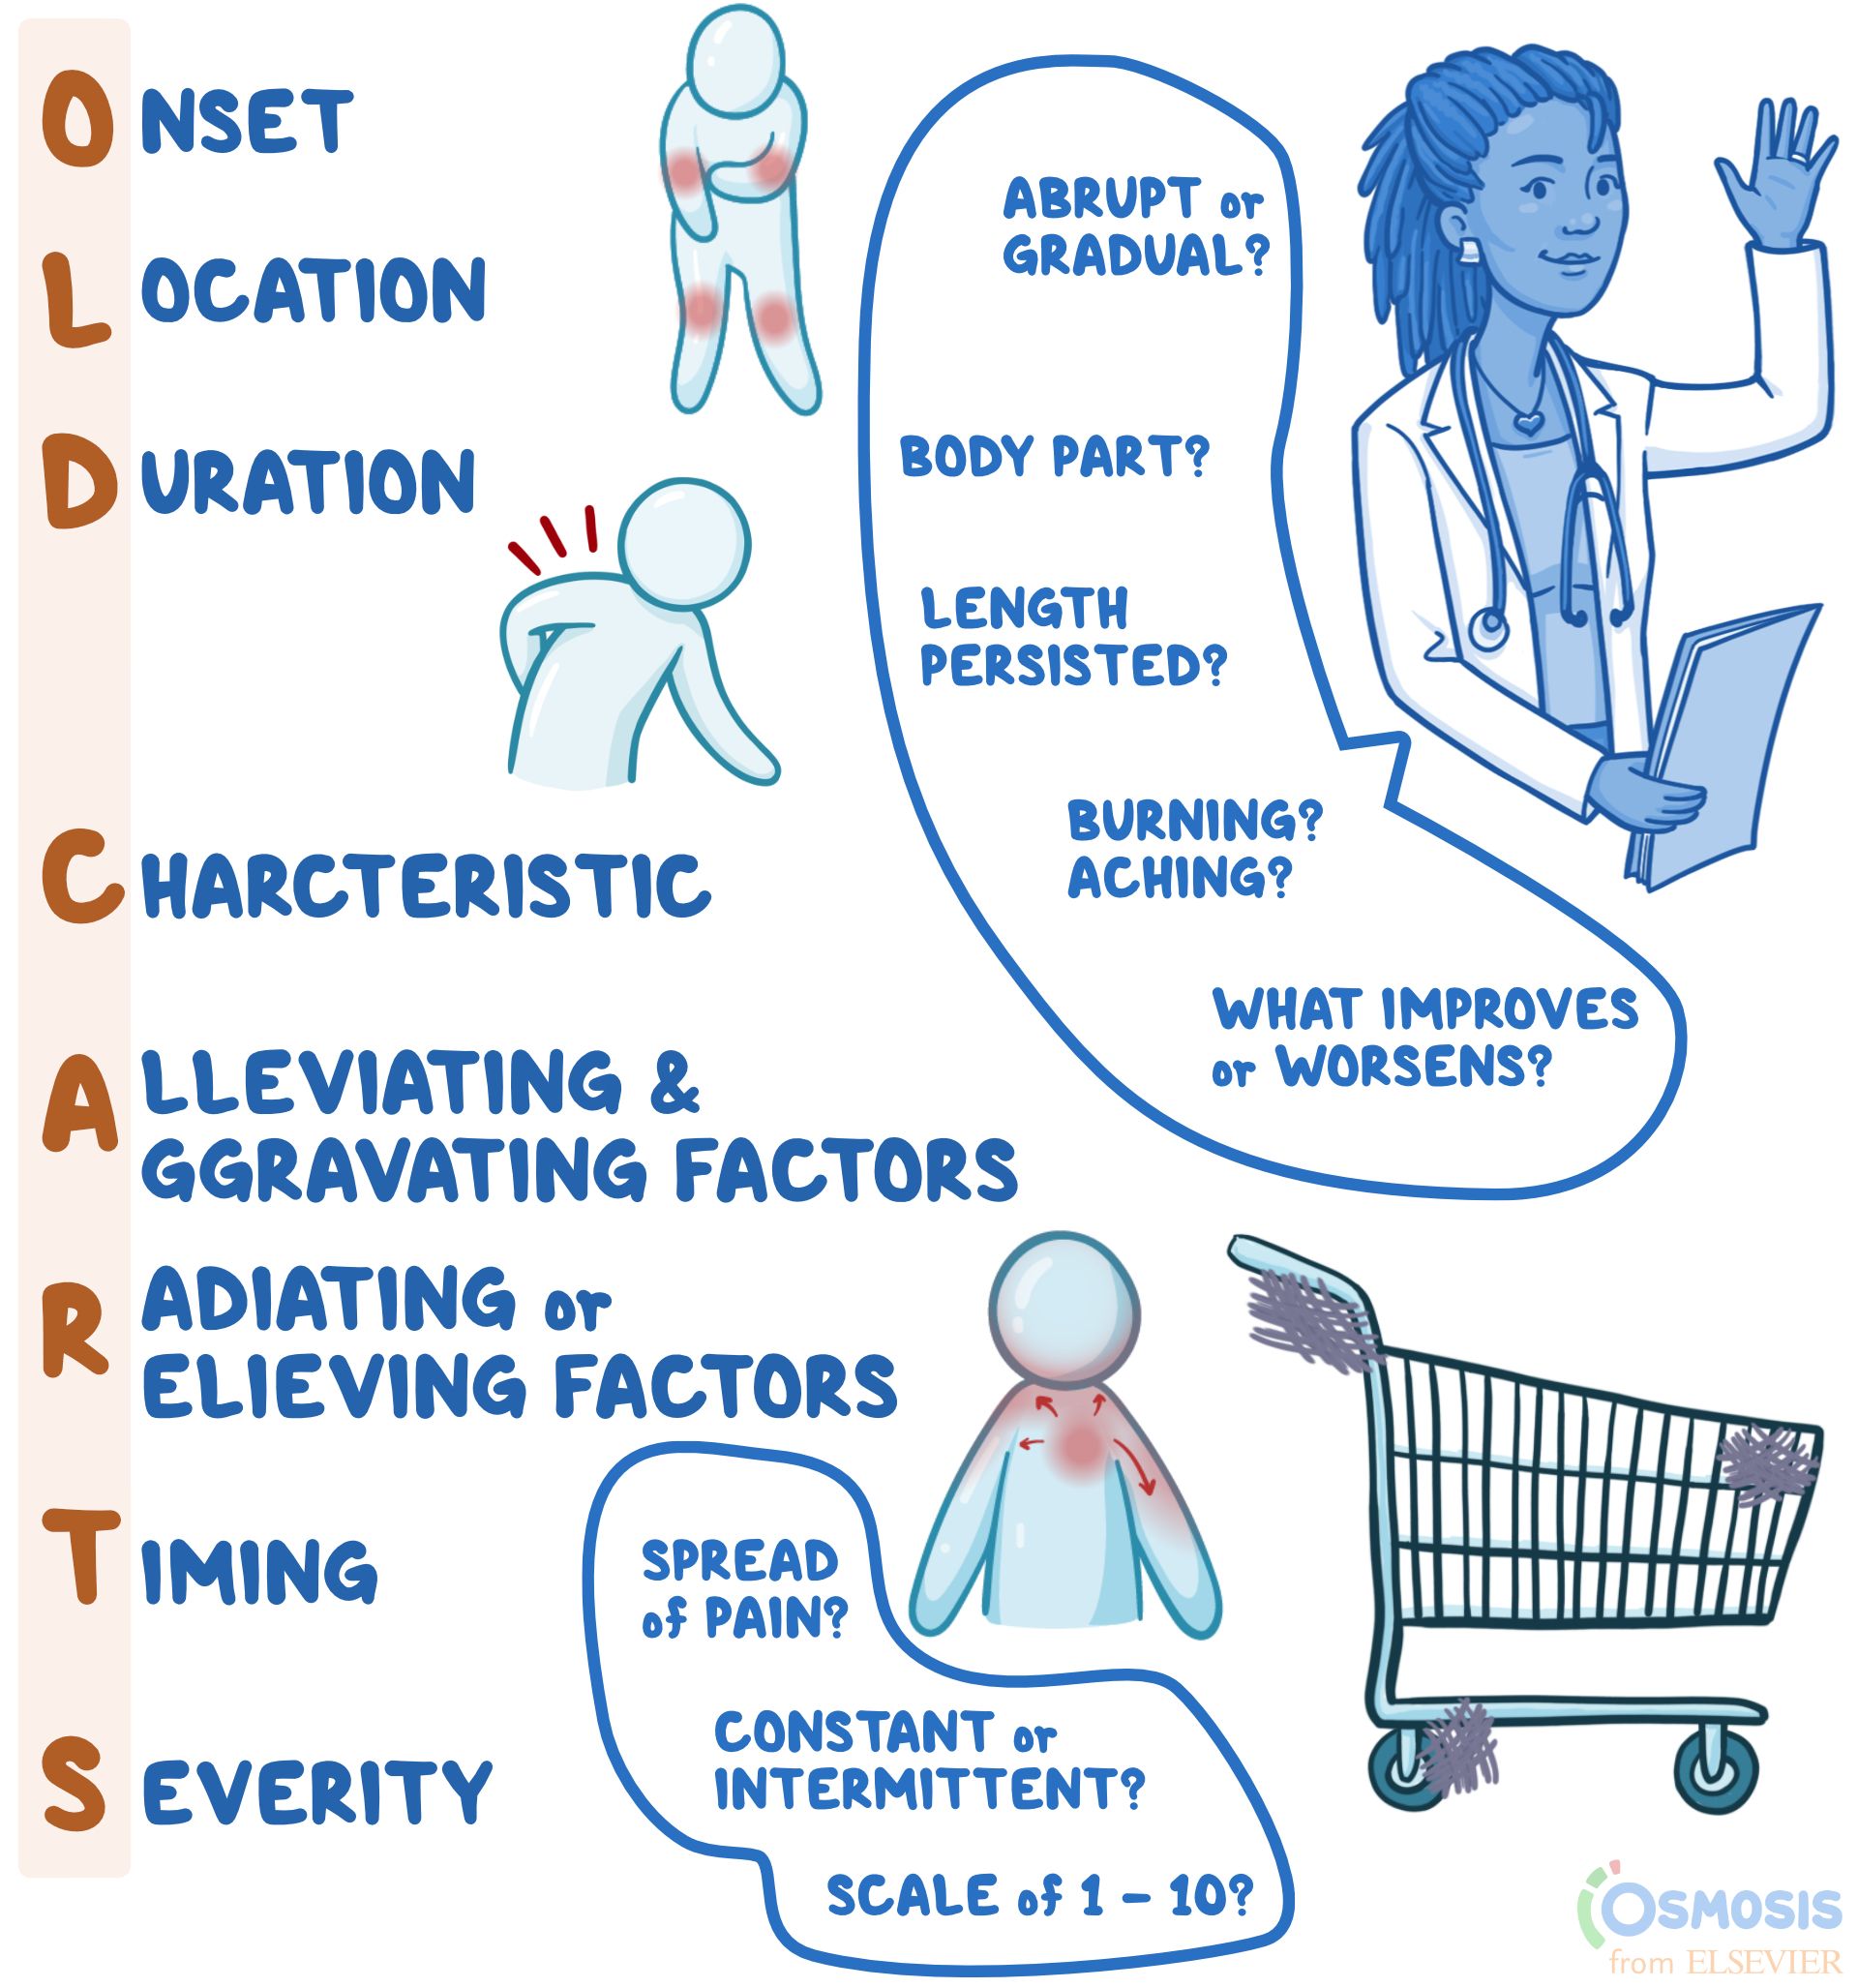
OLD CARTS
History-taking Mnemonic
Author: Lily Guo
Editors: Alyssa Haag, Ian Mannarino, MBA, MD, Kelsey LaFayette, DNP, RN
Illustrator: Jessica Reynolds, MS
Copyeditor: Sadia Zaman, MBBS, BSc
What does “OLD CARTS” mean?
"OLD CARTS" is a mnemonic device that assists clinicians in remembering the pertinent questions to ask while assessing an individual’s present illness. When a person presents to their clinician with complaints of a new or reoccurring medical problem, the clinician may use "OLD CARTS" as a structured guideline and framework from which they will ask questions and collect information before they perform a physical exam. Most commonly, "OLD CARTS" can be utilized for a patient who is experiencing pain, however, this mnemonic can be used as a framework for any presenting symptom.
What is a history of present illness?
A history of present illness, abbreviated HPI, refers to the description of an individual’s current health complaint, typically described in chronological order from the onset of their first sign and symptom to the present, defined as the moment they are sitting in front of the clinician. It is a narrative written in full-sentence format by the clinician that provides the necessary information for the clinician to generate differential diagnoses, guide medical-decision making, investigate the problem, and ultimately, provide the proper treatment.

What does the “O” in “OLD CARTS” mean?
The O in OLD CARTS means onset, indicating when and how the complaint began. For example, the clinician may ask if the pain has been present for hours, days, months, or years as well as if the pain occurs abruptly or gradually.
What does the “L” in “OLD CARTS” mean?
The “L” in “OLD CARTS” means location. This refers to where the pain is, including which specific body part (e.g., head, arm, leg, abdomen) and if the pain is isolated to one specific area (e.g., headache isolated to one side of the head, or abdominal pain of the right lower quadrant).
What does the “D” in “OLD CARTS” mean?
The “D” in “OLD CARTS” means duration. This refers to how long or how often the complaint occurs. For example, the pain may last for minutes, hours, or days at a time.
What does the “C” in “OLD CARTS” mean?
The “C” in “OLD CARTS” means characteristic. The clinician may ask the individual to describe their pain using words such as achy, dull, stabbing, sharp, throbbing, squeezing, itching, or burning.
What does the “A” in “OLD CARTS” mean?
The “A” in “OLD CARTS” means alleviating and aggravating factors. The individual may be asked if they did anything to help alleviate the pain, such as taking medications or resting. If they did try home remedies, it would be helpful to know if they improved the symptom. The clinician may also ask if anything worsens the pain, such as changing body position, walking up stairs, or eating.
What does the “R” in “OLD CARTS” mean?
The “R” in “OLD CARTS” means radiation, which refers to whether the pain travels to other parts of the body or whether it is isolated to one region only. “R” in “OLD CARTS” may also refer to relieving factors, or activities or treatments that reduce the pain. The mnemonic may vary slightly depending on the source.
What does the “T” in “OLD CARTS” mean?
The “T” in “OLD CARTS” means timing. This refers to if the pain is constant and experienced at all times, or if it is intermittent, meaning it comes and goes. If the pain is constant, the clinician might ask if the severity fluctuates throughout the day, which is referred to as waxing and waning pain. Meanwhile, if the symptom is intermittent in frequency, clinicians might ask how many times a week, month, or year it occurs.
What does the “S” in “OLD CARTS” mean?
The “S” in “OLD CARTS” means severity. For pain specifically, people are typically asked to rank their level of pain from one to ten, with ten being described as the worst pain they have ever experienced. Other questions to help gauge severity can include asking how the complaint interferes with day-to-day life or how bothersome the complaint is to the individual.
What are the most important facts to know about the “OLD CARTS” mnemonic?
“OLD CARTS” is a mnemonic device used by providers to guide their interview of a patient while documenting a history of present illness. The letters stand for onset; location; duration; characteristic; alleviating and aggravating factors; radiation or relieving factors; timing; and severity. What each letter stands for may vary slightly depending on the source of the mnemonic. Onset refers to when the symptom, for example pain, first began and whether it was abrupt or gradual; location refers to the body part(s) affected; duration refers to the length of time the symptoms have persisted; and characteristic refers to the individual’s description of the symptoms (i.e., burning, aching, sharp). Alleviating and aggravating factors are factors that improve or worsen symptoms, respectively; radiation refers to whether there is any spread of pain; timing refers to whether the pain is constant or intermittent; and lastly, severity is typically ranked on a scale of one to ten, with ten being the most severe. When used to guide documentation of an HPI, the mnemonic “OLD CARTS” can make patient evaluation and management more concise and efficient.
Wednesday, 24 August 2022
Physical health assessment
Physical Health Assessment: Methods and Steps (theworldbook.org)
The Four Methods of Health Assessment
The four basic methods or techniques for physical health assessment are:
- Inspection,
- Palpation,
- Percussion and
- Auscultation.
3 Steps of Health Assessment
- A complete medical history,
- A general survey and
- A complete physical assessment.
1. A Complete Medical History
History taking is the first step of Physical Health Assessment. The general framework for history taking is as follows:
- Presenting complaint.
- History of presenting complaint, including investigations, treatment, and referrals already arranged and provided.
- Past medical history: significant past diseases or illnesses, surgery, including complications, trauma.
- Drug history: now and past, prescribed and over-the-counter, allergies.
- Family history: especially parents, siblings, and children.
- Social history: smoking, alcohol, drugs, accommodation and living arrangements, marital status, baseline functioning, occupation, pets, and hobbies.
- Systems review: cardiovascular system, respiratory system, gastrointestinal system, nervous system, musculoskeletal system, genitourinary system
2. A General Survey
After collecting the health history and before going through the complete head to toe examination, some information or baseline data is collected which is called a general survey.
The general survey includes the person’s weight, height, body build, posture, gait, obvious signs of distress, level of hygiene and grooming, skin integrity, vital signs, oxygen saturation, and the person’s actual age compared and contrasted to the age that the person actually appears like.
For example, does the person appear to be older than his actual age? Does the person appear to be younger than his actual age?
3. A Complete Physical Assessment
A thorough physical assessment consists of the following:
- Vital Signs: The pulse, blood pressure, body temperature, and respiratory rate are measured.
- The Assessment of The Thorax and Lungs Including Lung Sounds: The size, symmetry, shape, and for the presence of any skin lesions and chest movements are observed. As well the breath sounds are observed and documented.
- The Assessment of The Cardiovascular System Including Heart Sounds: By listening to the heart sound it is observed that the heart is normal or not.
- The Assessment of The Head: The head movement is visualized over here.
- The Assessment of The Neck: The neck is visualized and the thyroid gland is inspected for any swelling and also for normal movement during swallowing.
- The Integumentary System Assessment: The color of the skin, the quality, distribution and condition of the bodily hair, the size, the location, color and type of any skin lesions are assessed and documented, the color of the nail beds, and the angle of curvature where the nails meet the skin of the fingers are also inspected.
- The Assessment of The Peripheral Vascular System: The peripheral veins are gently touched to determine the temperature of the skin, the presence of any tenderness, and swelling.
- The Assessment of The Breast and Axillae: The breasts are visualized to assess the size, shape, symmetry, color, and the presence of any dimpling, lesions, swelling, edema, visible lumps, and nipple retractions. The nipples are also assessed for the presence of any discharge, which is not normal for either gender except when the female is pregnant or lactating.
- The Assessment of The Abdomen: The abdomen is visualized to determine its size, contour, symmetry, and the presence of any lesions.
- The Assessment of The Musculoskeletal System: The major muscles of the body are inspected by the nurse to determine their size, and strength, and the presence of any tremors, contractures, muscular weakness and/or paralysis. All joints are measured for their full range of motion.
- The Assessment of The Neurological System: The Balance, gait, gross motor function, fine motor function and coordination, sensory functioning, temperature sensory functioning, kinesthetic sensations, and tactile sensory-motor functioning, as well as all of the cranial nerves, are measured.
- The Assessment of The Male and Female Genitalia and Inguinal Lymph Nodes: The skin and the pubic hair are inspected. The labia, clitoris, vagina and urethral opening are inspected among female clients. The penis, urethral meatus, and the scrotum are inspected among male clients.
- The Assessment of The Rectum and Anus: The rectum, anus and the surrounding area is examined for any abnormalities.
Thursday, 2 September 2021
https://www.blogger.com/blog/post/edit/6486482301949636226/6937353938257075980
Prescribing
Prescribing is an important component of patient care, which unfortunately can very easily go awry. The dangerous nature of prescription medications means that the process of prescribing is heavy regulated through legislation, clinical guidelines, local, regional and national protocols. What may seem like a relatively simple and straightforward process can sometimes be much more complex than it first appears.
Prescriptions represent a request from one healthcare professional to another to administer or supply medication to or for a patient. Some medications do not require a prescription as they are considered safe enough for patients to use without professional supervision and these are legally classified as general sale list medications (GSL). Medications that are considered less safe and require supervision by healthcare professionals are classified as prescription only medications, referred to as POMs and can only be used under the supervision of a prescribing healthcare professional. Anything that is not a GSL or POM is classified as a pharmacy medication or P medicine, which is only available under the supervision of a pharmacist.
Something you should consider first is the practical elements of prescribing. Prescribing can be completed in a range of formats, from the technical methods that use ePrescribing systems or ‘regimen prescribing’ (where users click a button and automatically prescribe a combination of medications) to handwritten prescription using pen and paper, or a combination of both.
The technical aspects of the prescription will vary from place to place but there a few key elements of the prescription that will remain the same, as these are required by law in the United Kingdom (namely the Medicines Act 1968, Misuse of Drugs Act 1971 and Pharmacy Order 2010). This is particularly true for products that are likely to be misused and require extra controls to manage their supply. These products are known as controlled drugs and are grouped into schedules, from 1-5, where 1 indicates a high likelihood for abuse with little clinical application and 5 indicates a clear clinical application with a low likelihood for abuse. This differs from the class system used by Her Majesty’s Courts and Tribunals Service to categorise criminal possession of substances.
The patient
Any prescription must include the patient’s name. This information is used to identify the patient and ensure that the right medication is given to the right patient. The address of the patient could be their residential address, care home or the ward the patient is on. The age or date of birth of the patient is a useful way to identify the patient, however for patients under the age of 12 years it is a legal requirement to include the age or date of birth. Age is a useful indicator of liver and kidney function as well as fat/water ratio which can alter the distribution, metabolism and elimination of medication from the body. This makes the age of the patient an essential piece of information when deciding if medication is clinically suitable. This is particularly important for children, hence the legal requirement, but also for elderly frail patients so including the age or date of birth of the patient represents good clinical practice.
Summary
- Full name
- Address
- Age or date of birth (must be included if the patient is under 12 years old)
The medication
Just like the technical aspects of prescribing, what can be prescribed will depend on where you are working and your level of training. Some medications can only be prescribed by healthcare professionals that are authorised to do so. This is typically the case for very expensive medications or very dangerous medications, such as chemotherapy or intravenous immunoglobulin.
You should check that you are authorised to prescribe the medication(s) you are trying to prescribe. This can be done easily on electronic systems, as the system may only let you select items you are authorised to prescribe, however, if using a manual prescribing process you should check the following resources:
- Clinical supervisor
- Practice or trust formulary
- Local formulary – developed by local and regional drug and therapeutics committees and usually available online
- Nurse Prescribers’ Formulary – for community nurse prescribers, available online
- Dental Practitioners’ Formulary – for dentists, available online
Decisions about which medication should be prescribed should be shared with patients and carers. About 1 out of every 10 prescribed medications are never started and about 50% of medications are not taken as they’re prescribed. Including patients in decisions about their care increases the likelihood that they will start and continue to take their medication.
Information that should be included on a prescription
Name of the drug
It is best practice to use the ‘generic’ or the actual name of the drug, rather than a branded product name, for most medications. As this will be cheaper for pharmacies to supply.
However, some medications should be prescribed using their branded name, particularly if they have a narrow therapeutic range. This means that the metabolism, distribution and elimination may be different between formulations of the same drug. For example, Lithium should be prescribed using the branded names of Priadel, Camcolit and Liskonum to ensure consistent drug serum levels.
The name of the drug must be included for schedule 2 and 3 controlled drug prescriptions.
Formulation
This is the ‘form’ you would like the medication to be in and describes how the drug will get into the patient. For example, as tablets, capsules, solution, elixir, suppository, pessary, cream, powder, pressurised inhaler, dry powder inhaler, subcutaneous injection, intramuscular injection or infusion.
There are many formulations available for most medications and if you’re unsure about which formulation to prescribe you should make a shared decision with the patient, if possible. If you’re not sure what form the medication takes, try and contact a pharmacist or pharmacy technician, who should be able to find out for you.
The formulation must be included for schedule 2 and 3 controlled drug prescriptions.
Strength
This is not the dose! The strength relates to how much drug is in the formulation you have requested. For example, 10mg tablets or 5mg tablets.
The strength must be included for schedule 2 and 3 controlled drug prescriptions.
Dose or instructions
Historically, doses were written using Latin and over time these were abbreviated. For example, omni die or once a day is abbreviated to OD. Many errors relating to prescriptions are caused by folks not just failing to read Latin, but failing to read abbreviated Latin! For example, quatro die or four times a day is abbreviated to QD, which can be misread as OD, if handwritten, leading to sub-therapeutic doses. To avoid errors then, try to write doses using plain English such as once, twice, three times (avoid thrice) or four times per day.
Doses can be ‘licensed’ or ‘unlicensed’. Licensed doses have been approved by regulators who have assessed the evidence for the product at a particular dose for a particular reason (or indication). Unlicensed doses or ‘off licence’ doses have not been approved and the evidence for use of the medication at that dose for that indication has not been assessed. When prescribing ‘off licence’ responsibility for the safety of the products use rests solely with the prescriber.
The dose of the medication should be checked in reliable resources, such as an up to date copy of the British National Formulary.
Some medications require a loading dose to enable a therapeutic serum level to be established quickly. For example, Warfarin requires the patient to be ‘loaded’ with a short term high dose followed by a longer-term lower dose. If you’re unsure if a medication requires a loading dose, contact a pharmacist.
Additionally, some medications have narrow therapeutic ranges, this means that patients can quite quickly build up toxic levels of the drug in their body and professionals need to monitor this. A very common example of this would be the Vitamin K antagonist Warfarin, which we monitor using the International Normalised Ratio or INR for short. The therapeutic range of a medication often depends on the indication and the patient, so make sure to check or set these for each prescription individually. Other approaches to monitoring may focus on the patient’s response to medication, for example monitoring white cell counts with clozapine, liver enzymes with statins or renal function with angiotensin-converting enzyme inhibitors.
Antagonists that block receptors should be introduced at low doses and gradually increased and, when stopping treatment, should typically be withdrawn slowly.
Dose or instructions must be included for schedule 2 and 3 controlled drug prescriptions.
Quantity
Quantity should be used to describe how long you would like the patient to use this medication. Many different units of measure can be used (e.g. days, weeks, months) or the actual quantity of medication you would like to be supplied (e.g. 7 tablets).
For schedule 2 or 3 controlled drugs you must include the actual quantity of medication you would like supplied in words and figures (e.g. SEVEN (7) tablets).
Summary
To summarise, good prescribers include the following information:
- Name
- Form
- Strength
- Dose
- Quantity
| Table 1: Common controlled drugs used in practice | Schedule |
| Morphine | Schedule 2 |
| Codeine | Schedule 5 |
| Tramadol | Schedule 3 |
| Pregabalin | Schedule 3 |
| Temazepam | Schedule 3 |
| Fentanyl | Schedule 2 |
| Oxycodone | Schedule 2 |
| Zopiclone | Schedule 4 Part 1 |
| Somatropin | Schedule 4 Part 2 |
| Cannabis | Schedule 1 |
The professional
Many times as a junior prescriber you may be asked to sign a prescription, however, not every healthcare professional has the authority to prescribe every medication. For example, junior doctors can not prescribe chemotherapy. During the signing of the prescription, it is important that enough information is provided to create a record of which healthcare professional is authorising the supply or administration of a medication. This enables prescribing practices to be audited and ensure that poor practices are identified.
Information about the prescriber that is required by the person signing the prescription is discussed below.
Name
This should be legible and be your ‘professional name’.
Authority to prescribe
This should indicate what qualification the professional has to prescribe. For example, an MBBS degree, a BDS degree or an independent prescribing qualification, membership of an association or accreditation. This could also include a particular role within an organisation.
This could also be a registration number with statutory bodies that can be checked to verify a prescribers status, such as the GMC, GPhC, GDC and NMC.
Date
This should include the date that the prescription was issued by the professional. This may be different from the date that the prescription should be started and if the prescription is to begin on a specified date this information should be included under the dose or instruction section of the prescription.
Prescriptions can be pre-dated (for a time in the future) but should not usually be post-dated (to cover a period of use in the past) unless there are exceptional circumstances. For example, pharmacists can make supplies of medication legally if there is an agreement for a prescription to be written within the next 24 hours.
What you need to decide: patient safety
The therapeutic decision-making process is influenced by lots of different things. Primarily, all therapeutic decisions should involve the patient and their carers, if possible.
All medication comes with side effects and avoidable adverse drug reactions cost the NHS approximately £98.5 million per year. Whenever you’re prescribing medication, you should always consider the risk and benefits of the medication. A good way to do this is to consider the necessity of the medication.
Dosing
Once necessity has been identified, you should consider how much of the medication is needed for a therapeutic effect. This decision should be evidence-based but person-centred. For example, some randomised controlled trials will identify a therapeutic dose, however, the participants in the trial may be very different to the patient in front of you.
Most medications are prescribed according to actual body weight (mg/Kg) but beware of hydrophilic medications that require dosing via ideal body weight, such as gentamicin.
Watch out for daily versus divided dosing (e.g. Paracetamol 15mg/Kg/dose or 60mg/kg/day).
Prescribing too much medication can lead to dose-dependent side effects, wastage and inappropriate polypharmacy so try to use the smallest dose for the shortest period where possible.
Duration
After dosing, consider the duration. Does the medication require acute or chronic use? Is this acceptable to the patient?
This is a particularly useful consideration for treatments that can cause dependence such as opioids, benzodiazepines, z-drugs, gabapentinoids as well medication where long-term use can lead to complications (e.g. corticosteroids) or resistance (e.g. antimicrobials).
Interactions
Before finalising a prescription, you should dedicate some time to reviewing what other medication the patient takes (if any) and how this newly prescription may interfere with absorption, distribution, metabolism and elimination of other medication. This can be tricky as interactions can be significant or non-significant. Useful resources include Stockley’s Drug Interactions, the BNF, MedicinesComplete Interaction Checker and a pharmacist or pharmacy technician.
Monitoring
The therapeutic effect of medication requires monitoring. This may include regular reviews with the patient regarding their symptoms as well as ordering and reviewing tests such as full blood count, liver and kidney function tests, eye tests, and lung function tests.