Monday 9 January 2023

 Nice guidelines 


https://www.nice.org.uk/guidance/ng158/evidence/a-ddimer-testing-in-the-diagnosis-of-deep-vein-thrombosis-and-pulmonary-embolism-pdf-8710588334  

Saturday 10 September 2022

https://www.betterhealth.vic.gov.au/health/conditionsandtreatments/diabetes-and-insulin 


 With type 1 diabetes, the body does not make any insulin and therefore insulin has to be injected regularly every day to stay alive. With type 2 diabetes, the body does not make enough insulin, or the insulin that is made does not work well. Insulin injections are sometimes needed to manage blood glucose levels. The 5 types of insulin are: rapid-acting insulin short-acting insulin intermediate-acting insulin mixed insulin long-acting insulin. Rapid-acting insulin Rapid-acting insulin starts working somewhere between 2.5 to 20 minutes after injection. Its action is at its greatest between one and 3 hours after injection and can last up to 5 hours. This type of insulin acts more quickly after a meal, similar to the body's natural insulin, reducing the risk of a low blood glucose (blood glucose below 4 mmol/L). When you use this type of insulin, you must eat immediately or soon after you inject. The 3 rapid-acting insulin types currently available in Australia are: Fiasp and NovoRapid® (insulin aspart) Humalog® (insulin lispro) Apidra® (insulin glulisine). Fiasp – released in Australia June 2019 – is a new, rapid acting insulin with faster onset of action. It is designed to improve blood glucose levels after a meal. Short-acting insulin Short-acting insulin takes longer to start working than the rapid-acting insulins. Short-acting insulin begins to lower blood glucose levels within 30 minutes, so you need to have your injection 30 minutes before eating. It has its maximum effect 2 to 5 hours after injection and lasts for 6 to 8 hours. Short-acting insulins currently available in Australia are: Actrapid® Humulin® R. Intermediate-acting insulin Intermediate-acting and long-acting insulins are often termed background or basal insulins. The intermediate-acting insulins are cloudy in nature and need to be mixed well. These insulins begin to work about 60 to 90 minutes after injection, peak between 4 to 12 hours and last for between 16 to 24 hours. Intermediate-acting insulins currently available in Australia are: Humulin® NPH (a human isophane insulin) Protaphane® (a human isophane insulin). Long-acting insulin The long-acting insulins currently available in Australia are: Lantus® (glargine insulin) – slow, steady release of insulin with no apparent peak action. One injection can last up to 24 hours. It is usually injected once a day but can be taken twice daily. Toujeo (glargine insulin) – this insulin has a strength of 300 units per ml so is 3 times the concentration of other insulin in Australia. It is given once a day and lasts for at least 24 hours. It should not be confused with regular Lantus which has a strength of 100 units per ml. Toujeo is given for safety by a disposable pen only. Toujeo gives a slower, steadier glucose profile especially during the night. Levemir® (detemir insulin) – slow, steady release of insulin with no apparent peak action and can last up to 18 hours. It is usually injected twice daily. Although these insulins are long-acting, they are clear and do not need mixing before injecting. Mixed insulin Mixed insulin contains a pre-mixed combination of either very rapid-acting or short-acting insulin, together with intermediate-acting insulin. The mixed insulins currently available in Australia are: rapid-acting and intermediate-acting insulin NovoMix® 30 (30% rapid, 70% intermediate Protaphane) Humalog® Mix 25 (25% rapid, 75% intermediate Humulin NPH) Humalog® Mix 50 (50% rapid, 50% intermediate Humulin NPH) rapid-acting and long-acting inslulin Ryzodeg 70:30 (70% long acting Degludec, 30% rapid Aspart) short-acting and intermediate-acting insulin Mixtard® 30/70 (30% short, 70% intermediate Protaphane) Mixtard® 50/50 (50% short, 50% intermediate Protaphane) Humulin® 30/70 (30% short, 70% intermediate Humulin NPH). Note In Australia, the strength of the above insulins is 100 units per ml. Some countries have different strengths. The exception to this is the once-daily long-acting insulin Toujeo which was released in 2015 and has a strength of 300 units per ml. Do not change between Lantus and Toujeo without consulting a health professional. Insulin injection devices Different insulin delivery devices are available. The main choices are syringes, insulin pens and insulin pumps. Insulin syringes Syringes are manufactured in 30-unit (0.3 ml), 50-unit (0.5 ml) and 100-unit (1.0 ml) measures. The size of the syringe needed will depend on the insulin dose. For example, it is easier to measure a 10 unit dose in a 30 unit syringe and 55 units in a 100 unit syringe. The needles on the syringes are available in lengths ranging from 6 to 8 mm. Your doctor or diabetes nurse educator will help you decide which syringe and needle size is right for you. Insulin syringes are single-use only, and are free for people in Australia registered with the National Diabetes Service Scheme (NDSS). Most Australian adults no longer use syringes to inject insulin. They now use insulin pens for greater convenience. Insulin pens Insulin companies have designed insulin pens (disposable or reusable) to be used with their own brand of insulin. Disposable insulin pens already have the insulin cartridge in the pen. They are discarded when they are empty, when they have been out of the fridge for one month, or when the use-by date is reached. Reusable insulin pens require insertion of a 3 ml insulin catridge. The insulin strength per ml is 100 units. When finished, a new cartridge or penfill is inserted. Reusable insulin pens are designed by the insulin companies to fit their particular brand of insulin cartridge/penfill. Pen cartridges also need to be discarded one month after commencing if insulin still remains in the cartridge. Your doctor or diabetes nurse educator will advise you about the right type of pen for your needs. Pen needles are disposable needles that screw on to an insulin pen device to allow insulin to be injected. They are available in different lengths, ranging from 4 to 12.7 mm. However research recommends that size 4 to 5 mm pen needles are used. The thickness of the needle (gauge) also varies – the higher the gauge, the finer the needle. It is important that a new pen needle is used with each injection. Your diabetes nurse educator can advise you on the appropriate needle length and show you correct injection technique. Insulin pumps An insulin pump is a small programmable device that holds a reservoir of insulin and is worn outside the body. The insulin pump is programmed to deliver insulin into the fatty tissue of the body (usually the abdomen) through thin plastic tubing known as an infusion set or giving set. Only rapid-acting insulin is used in the pump. The infusion set has a fine needle or flexible cannula that is inserted just below the skin. This is changed every 2 to 3 days. The pump is pre-programmed by the user and their health professional to automatically deliver small continual amounts of insulin to keep blood glucose levels stable between meals. Individuals can instruct the pump to deliver a burst of insulin each time food is eaten, similar to the way the pancreas does in people without diabetes. The insulin pump isn't suitable for everyone. If you're considering using one, you must discuss it first with your diabetes healthcare team. The cost of an insulin pump is generally covered by private health insurance for people with type 1 diabetes (a waiting period applies). Disposable extras required for use (such as cannulas, lines and reservoirs) are subsidised by the National Diabetes Service Scheme (NDSS). Insulin injection sites Insulin is injected through the skin into the fatty tissue known as the subcutaneous layer. It shouldn't go into muscle or directly into the blood, as this changes how quickly the insulin is absorbed and works. Absorption of insulin varies depending on where in the body it is injected. The abdomen absorbs insulin the fastest and is used by most people. The upper arms, buttocks and thighs have a slower absorption rate and can also be used. Factors that speed insulin absorption Variation in insulin absorption can cause changes in blood glucose levels. Insulin absorption is increased by: injecting into an exercised area such as the thighs or arms high temperatures due to a hot shower, bath, hot water bottle, spa or sauna massaging the area around the injection site injecting into muscle – this causes the insulin to be absorbed more quickly and could cause blood glucose levels to drop too low. Factors that delay insulin absorption Insulin absorption can be delayed by: over-use of the same injection site, which causes the area under the skin to become lumpy or scarred (known as lipohypertrophy) insulin that is cold (for example, if insulin is injected immediately after taking it from the fridge)

Tuesday 6 September 2022

History taking

The SOCRATES acronym stands for: Site Onset Character Radiation Associated symptoms Timing Exacerbating and relieving factors Severity Using SOCRATES in history taking SOCRATES provides a structured framework for taking a medical history. Each section of SOCRATES is described below, with example questions. Depending on the patient’s symptoms, not all parts of SOCRATES may be relevant. For example, some symptoms (e.g. breathlessness or fatigue) will not have a specific anatomical location or radiation. Site Ask about the location of the symptom: “Where is the [symptom]?” “Can you point to where you experience the [symptom]?” Onset Clarify how and when the symptom developed: “Did the [symptom] come on suddenly or gradually?” “When did the [symptom] first start?” “How long have you been experiencing [symptom]?” Character Ask about the specific characteristics of the symptom: “How would you describe the [symptom]?” “Is the [symptom] constant or does it come and go?” Radiation Ask if the symptom moves anywhere else: “Does the [symptom] spread elsewhere?” Associated symptoms Ask if there are other symptoms which are associated with the primary symptom: “Are there any other symptoms that seem associated with the [symptom]?” Timing Clarify how the symptom has changed over time: “How has the [symptom] changed over time?” Exacerbating and relieving factors Ask if anything makes the symptom worse or better: “Does anything make the [symptom] worse?” “Does anything make the [symptom] better?” Severity Assess the severity of the symptom by asking the patient to grade it on a scale of 0-10: “On a scale of 0-10, how severe is the [symptom], if 0 is no [symptom] and 10 is the worst [symptom] you’ve ever experienced?” https://geekymedics.com/the-socrates-acronym-in-history-taking/

Saturday 27 August 2022

ACS

Immediate management ACS is an emergency situation and an initial ABCDE approach should be taken. See the Geeky Medics guide to the acute management of ACS for more information. Immediate management of ACS includes: Antiplatelet therapy: aspirin 300mg Analgesia: either GTN or intravenous opioids Initial anti-thrombin therapy: fondaparinux if low bleeding risk and the patient is not undergoing immediate angiography. Unfractionated heparin can be used for patients with renal impairment. Supplemental oxygen should be offered only to patients with SpO2 of less than 94%. Acute coronary syndrome (ACS) refers to a range of acute myocardial ischaemic states including: ST-elevation myocardial infarction (STEMI) Non-ST elevation myocardial infarction (NSTEMI) Unstable angina Myocardial infarction (MI) can be classified as either type 1 or type 2. Type 1 MIs are caused by plaque rupture whilst type 2 MIs occur secondary to decreased supply (e.g. anaemia, hypoxaemia, hypotension) or increased demand (e.g. arrhythmias such as atrial fibrillation with rapid ventricular response). ACS is life-threatening and must be recognised and treated in a timely manner. Remember: time is myocardium! This guide provides an overview of the recognition and immediate management of ACS using an ABCDE approach. The ABCDE approach can be used to perform a systematic assessment of a critically unwell patient. It involves working through the following steps: Airway Breathing Circulation Disability Exposure Each stage of the ABCDE approach involves clinical assessment, investigations and interventions. Problems are addressed as they are identified and the patient is re-assessed regularly to monitor their response to treatment. Clinical features of ACS Symptoms Typical symptoms associated with ACS include: Chest pain Referred pain­: chest pain can radiate to the epigastrium, arm, neck and jaw. Shortness of breath Palpitations Nausea and vomiting Sweating Syncope Clinical signs Typical clinical signs associated with ACS include: Tachycardia Tachypnoea Pallor Evidence of impaired myocardial function: hypotension, raised jugular venous pressure (JVP), coarse crackles on chest auscultation and additional heart sounds (e.g. pan-systolic murmur). Tips before you begin General tips for applying an ABCDE approach in an emergency setting include: Treat all problems as you discover them. Re-assess regularly and after every intervention to monitor a patient’s response to treatment. Make use of the team around you by delegating tasks where appropriate. All critically unwell patients should have continuous monitoring equipment attached for accurate observations. Clearly communicate how often would you like the patient’s observations relayed to you by other staff members. If you require senior input, call for help early using an appropriate SBARR handover structure. Review results as they become available (e.g. laboratory investigations). Make use of your local guidelines and algorithms in managing specific scenarios (e.g. acute asthma). Any medications or fluids will need to be prescribed at the time (in some cases you may be able to delegate this to another member of staff). Your assessment and management should be documented clearly in the notes, however, this should not delay initial clinical assessment, investigations and interventions. Initial steps Acute scenarios typically begin with a brief handover from a member of the nursing staff including the patient’s name, age, background and the reason the review has been requested. You may be asked to review a patient with ACS due to chest pain and/or shortness of breath. Introduction Introduce yourself to whoever has requested a review of the patient and listen carefully to their handover. Interaction Introduce yourself to the patient including your name and role. Ask how the patient is feeling as this may provide some useful information about their current symptoms. Preparation Make sure the patient’s notes, observation chart and prescription chart are easily accessible. Ask for another clinical member of staff to assist you if possible. If the patient is unconscious or unresponsive, start the basic life support (BLS) algorithm as per resuscitation guidelines. Airway Clinical assessment Can the patient talk? Yes: if the patient can talk, their airway is patent and you can move on to the assessment of breathing. No: Look for signs of airway compromise: these include cyanosis, see-saw breathing, use of accessory muscles, diminished breath sounds and added sounds. Open the mouth and inspect: look for anything obstructing the airway such as secretions or a foreign object. Interventions Regardless of the underlying cause of airway obstruction, seek immediate expert support from an anaesthetist and the emergency medical team (often referred to as the ‘crash team’). In the meantime, you can perform some basic airway manoeuvres to help maintain the airway whilst awaiting senior input. Head-tilt chin-lift manoeuvre Open the patient’s airway using a head-tilt chin-lift manoeuvre: 1. Place one hand on the patient’s forehead and the other under the chin. 2. Tilt the forehead back whilst lifting the chin forwards to extend the neck. 3. Inspect the airway for obvious obstruction. If an obstruction is visible within the airway, use a finger sweep or suction to remove it. Jaw thrust If the patient is suspected to have suffered significant trauma with potential spinal involvement, perform a jaw-thrust rather than a head-tilt chin-lift manoeuvre: 1. Identify the angle of the mandible. 2. With your index and other fingers placed behind the angle of the mandible, apply steady upwards and forward pressure to lift the mandible. 3. Using your thumbs, slightly open the mouth by downward displacement of the chin. Oropharyngeal airway (Guedel) Airway adjuncts are often helpful and in some cases essential to maintain a patient’s airway. They should be used in conjunction with the maneuvres mentioned above as the position of the head and neck need to be maintained to keep the airway aligned. An oropharyngeal airway is a curved plastic tube with a flange on one end that sits between the tongue and hard palate to relieve soft palate obstruction. It should only be inserted in unconscious patients as it is otherwise poorly tolerated and may induce gagging and aspiration. To insert an oropharyngeal airway: 1. Open the patient’s mouth to ensure there is no foreign material that may be pushed into the larynx. If foreign material is present, attempt removal using suction. 2. Insert the oropharyngeal airway in the upside-down position until you reach the junction of the hard and soft palate, at which point you should rotate it 180°. The reason for inserting the airway upside down initially is to reduce the risk of pushing the tongue backwards and worsening airway obstruction. 3. Advance the airway until it lies within the pharynx. 4. Maintain head-tilt chin-lift or jaw thrust and assess the patency of the patient’s airway by looking, listening and feeling for signs of breathing. Nasopharyngeal airway (NPA) A nasopharyngeal airway is a soft plastic tube with a bevel at one end and a flange at the other. NPAs are typically better tolerated in patients who are partly or fully conscious compared to oropharyngeal airways. NPAs should not be used in patients who may have sustained a skull base fracture, due to the small but life-threatening risk of entering the cranial vault with the NPA. To insert a nasopharyngeal airway: 1. Check the patency of the patient’s right nostril and if required (depending on the model of NPA) insert a safety pin through the flange of the NPA. 2. Lubricate the NPA. 3. Insert the airway bevel-end first, vertically along the floor of the nose with a slight twisting action. 4. If any obstruction is encountered, remove the tube and try the left nostril. Other interventions If the patient has clinical signs of anaphylaxis (e.g. angioedema, rash) commence appropriate treatment as discussed in our anaphylaxis guide. CPR If the patient loses consciousness and there are no signs of life on assessment, put out a crash call and commence CPR. Re-assessment Make sure to re-assess the patient after any intervention. Breathing Clinical assessment Observations Review the patient’s respiratory rate: A normal respiratory rate is between 12-20 breaths per minute. Patients with ACS may be tachypnoeic in an attempt to increase myocardial tissue oxygenation. Review the patient’s oxygen saturation (SpO2): A normal SpO2 range is 94-98% in healthy individuals and 88-92% in patients with COPD who are at high-risk of CO2 retention. Hypoxaemia may occur due to cardiac failure and secondary pulmonary oedema. Auscultation Auscultate both lungs: Reduced air entry bilaterally suggests significant airway compromise and the need for critical care input. Crackles or crepitations on auscultation may represent pulmonary oedema due to impaired cardiac function. Percussion Percuss the chest to assess for dullness associated with pleural effusion (e.g. secondary to cardiac failure). Investigations and procedures Arterial blood gas Take an ABG if indicated (e.g. low SpO2) to quantify the degree of hypoxia. An ABG should not delay the management of ACS. Chest X-ray A chest X-ray may be indicated if abnormalities are noted on auscultation (e.g. reduced air entry, coarse crackles) to screen for evidence of pulmonary oedema. A chest X-ray should not delay the emergency management of ACS. See our CXR interpretation guide for more details. Interventions Oxygen Administer oxygen if the patient has a low SpO2. This typically involves the use of a non-rebreathe mask with an oxygen flow rate of 15L. If the patient has COPD and a history of CO2 retention you should switch to a venturi mask as soon as possible and titrate oxygen appropriately. If the patient is conscious, sit them upright as this can also help with oxygenation. Continuous positive airway pressure Continuous positive airway pressure (CPAP) should be considered for patients who do not improve after supplemental oxygen and intravenous diuretics (see below). Commencing CPAP is a skill beyond the scope of most junior doctors and should always involve more senior doctors. CPR If the patient loses consciousness and there are no signs of life on assessment, put out a crash call and commence CPR. Re-assessment Make sure to re-assess the patient after any intervention. Circulation Clinical assessment Pulse Assess the patient’s pulse: Tachycardia is a common feature of ACS. Bradycardia is a late sign and often precedes cardiac arrest. Blood pressure Assess the patient’s blood pressure: Patients may be hypertensive due to increased sympathetic activity and pain. Hypotension is a late sign and represents cardiac failure. Inspection Inspect the patient from the end of the bed: they may appear in pain and clammy/pale. Fluid balance assessment Calculate the patient’s fluid balance: Calculate the patient’s current fluid balance using their fluid balance chart (e.g. oral fluids, intravenous fluids, urine output, drain output, stool output, vomiting) to inform resuscitation efforts. Reduced urine output (oliguria) is typically defined as less than 0.5ml/kg/hour in an adult. Investigations and procedures Intravenous cannulation Insert at least one wide-bore intravenous cannula (14G or 16G) and take blood tests as discussed below. See our intravenous cannulation guide for more details. Blood tests Collect blood tests after cannulating the patient including: Troponin: to help confirm the diagnosis of myocardial infarction. FBC: to screen for anaemia and signs of infection. U&Es: to assess renal function and electrolyte levels. CRP: to screen for evidence of infection. Serum glucose: to identify hyperglycaemia which should then be treated to improve outcomes. LFTs: to assess liver function (e.g. ischaemic hepatitis secondary to cardiac failure). Coagulation screen: to assess for coagulopathy. Record an ECG In the context of ACS, an ECG can provide valuable information as to the sub-type of ACS. Typical findings in each of the subtypes of ACS include: STEMI: ST elevation and/or new left bundle branch block (LBBB) NSTEMI: T wave inversion and/or ST depression Unstable angina: often there are no specific ECG abnormalities Interventions Morphine Morphine has a dual purpose in ACS treatment, both as a coronary artery vasodilator and as an analgaesic. Nitrates Nitrates, such as glyceryl trinitrate spray, cause coronary artery vasodilation and improve cardiac perfusion. If the patient is hypotensive, nitrates are contraindicated due to their vasodilatory effects. Aspirin and clopidogrel Aspirin (300mg) and clopidogrel (300mg) are administered to try and improve blood flow through the coronary vessels by inhibiting platelet aggregation. Diuretics If clinical signs of pulmonary oedema are present (e.g. shortness of breath, coarse bibasal crackles) consider administration of an intravenous diuretic (e.g. furosemide): Furosemide increases diuresis and aids the clearance of pulmonary oedema. If a patient is hypotensive, diuretics should not be administered in a ward setting and urgent critical care input should be sought. Fluid resuscitation Hypovolaemic patients require fluid resuscitation: Administer a 500ml bolus of Hartmann’s solution or 0.9% sodium chloride (warmed if available) over 15 mins. Administer 250ml boluses in patients at increased risk of fluid overload (e.g. heart failure). After each fluid bolus, reassess for clinical evidence of fluid overload (e.g. auscultation of the lungs, assessment of JVP). Repeat administration of fluid boluses up to four times (e.g. 2000ml or 1000ml in patients at increased risk of fluid overload), reassessing the patient each time. Seek senior input if the patient has a negative response (e.g. increased chest crackles) or if the patient isn’t responding adequately to repeated boluses (i.e. persistent hypotension). See our fluid prescribing guide for more details on resuscitation fluids. Percutaneous coronary intervention (PCI) Patients with clinical evidence of STEMI require urgent PCI and should be discussed with the on-call interventional cardiologist as soon as possible. CPR If the patient loses consciousness and there are no signs of life on assessment, put out a crash call and commence CPR. Re-assessment Make sure to re-assess the patient after any intervention. Disability Clinical assessment Consciousness In the context of ACS with hypotension, a patient’s consciousness level may be reduced. Assess the patient’s level of consciousness using the AVPU scale: Alert: the patient is fully alert, although not necessarily orientated. Verbal: the patient makes some kind of response when you talk to them (e.g. words, grunt). Pain: the patient responds to a painful stimulus (e.g. supraorbital pressure). Unresponsive: the patient does not show evidence of any eye, voice or motor responses to pain. If a more detailed assessment of the patient’s level of consciousness is required, use the Glasgow Coma Scale (GCS). Pupils Assess the patient’s pupils: Inspect the size and symmetry of the patient’s pupils Assess direct and consensual pupillary responses Drug chart review Review the patient’s drug chart for medications which may cause a reduced level of consciousness (e.g. opioids, sedatives, anxiolytics, insulin, oral hypoglycaemic medications). Investigations and procedures Blood glucose and ketones Measure the patient’s capillary blood glucose level to screen for causes of a reduced level of consciousness (e.g. hypoglycaemia or hyperglycaemia). A blood glucose level may already be available from earlier investigations (e.g. ABG, venepuncture). The normal reference range for fasting plasma glucose is 4.0 – 5.8 mmol/l. Hypoglycaemia is defined as a plasma glucose of less than 3.0 mmol/l. In hospitalised patients, a blood glucose ≤4.0 mmol/L should be treated if the patient is symptomatic. See our blood glucose measurement guide for more details. Imaging Request a CT head if intracranial pathology is suspected after discussion with a senior. See our guide on interpreting a CT head for more details. Interventions Maintain the airway Alert a senior immediately if you have any concerns about the consciousness level of a patient. A GCS of 8 or below warrants urgent expert help from an anaesthetist. In the meantime, you should re-assess and maintain the patient’s airway as explained in the airway section of this guide. CPR If the patient loses consciousness and there are no signs of life on assessment, put out a crash call and commence CPR. Re-assessment Make sure to re-assess the patient after any intervention. Exposure It may be necessary to expose the patient during your assessment: remember to prioritise patient dignity and conservation of body heat. Clinical assessment Inspection Inspect for relevant clues and clinical signs which may indicate increased cardiovascular risk (e.g. cigarettes, xanthelasma, corneal arcus). Look for any sources of bleeding which may have precipitated a myocardial infarction (e.g. rectal bleeding). Urine output Review the patient’s urine output as part of a fluid balance assessment to inform ongoing fluid management. Temperature Measure the patient’s temperature: If fever is present, make sure to consider co-existing infection. Patients with ACS may develop a fever as part of a catecholamine response. Interventions Catheterisation Catheterise the patient to closely monitor urine output to guide fluid resuscitation and need for escalation. CPR If the patient loses consciousness and there are no signs of life on assessment, put out a crash call and commence CPR. Re-assessment Make sure to re-assess the patient after any intervention. Reassess ABCDE Re-assess the patient using the ABCDE approach to identify any changes in their clinical condition and assess the effectiveness of your previous interventions. Deterioration should be recognised quickly and acted upon immediately. Seek senior help if the patient shows no signs of improvement or if you have any concerns. Support You should have another member of the clinical team aiding you in your ABCDE assessment, such a nurse, who can perform observations, take samples to the lab and catheterise if appropriate. You may need further help or advice from a senior staff member and you should not delay seeking help if you have concerns about your patient. Use an effective SBARR handover to communicate the key information effectively to other medical staff. Next steps Well done, you’ve now stabilised the patient and they’re doing much better. There are just a few more things to do… Take a history Revisit history taking to explore relevant medical history. If the patient is confused you might be able to get a collateral history from staff or family members as appropriate. See our history taking guides for more details. Review Review the patient’s notes, charts and recent investigation results. Review the patient’s current medications and check any regular medications are prescribed appropriately. Document Clearly document your ABCDE assessment, including history, examination, observations, investigations, interventions, and the patient’s response. See our documentation guides for more details. Discuss Discuss the patient’s current clinical condition with a senior clinician using an SBARR style handover. Questions which may need to be considered include: Are any further assessments or interventions required? Does the patient need a referral to HDU/ICU? Does the patient need reviewing by a specialist? Should any changes be made to the current management of their underlying condition(s)? Handover The next team of doctors on shift should be made aware of any patient in their department who has recently deteriorated. source : https://geekymedics.com/acute-coronary-syndrome-acs-emergency-management-abcde/

Friday 26 August 2022

old carts


OLD CARTS

History-taking Mnemonic

AuthorLily Guo

EditorsAlyssa HaagIan Mannarino, MBA, MDKelsey LaFayette, DNP, RN

IllustratorJessica Reynolds, MS

CopyeditorSadia Zaman, MBBS, BSc


What does “OLD CARTS” mean?

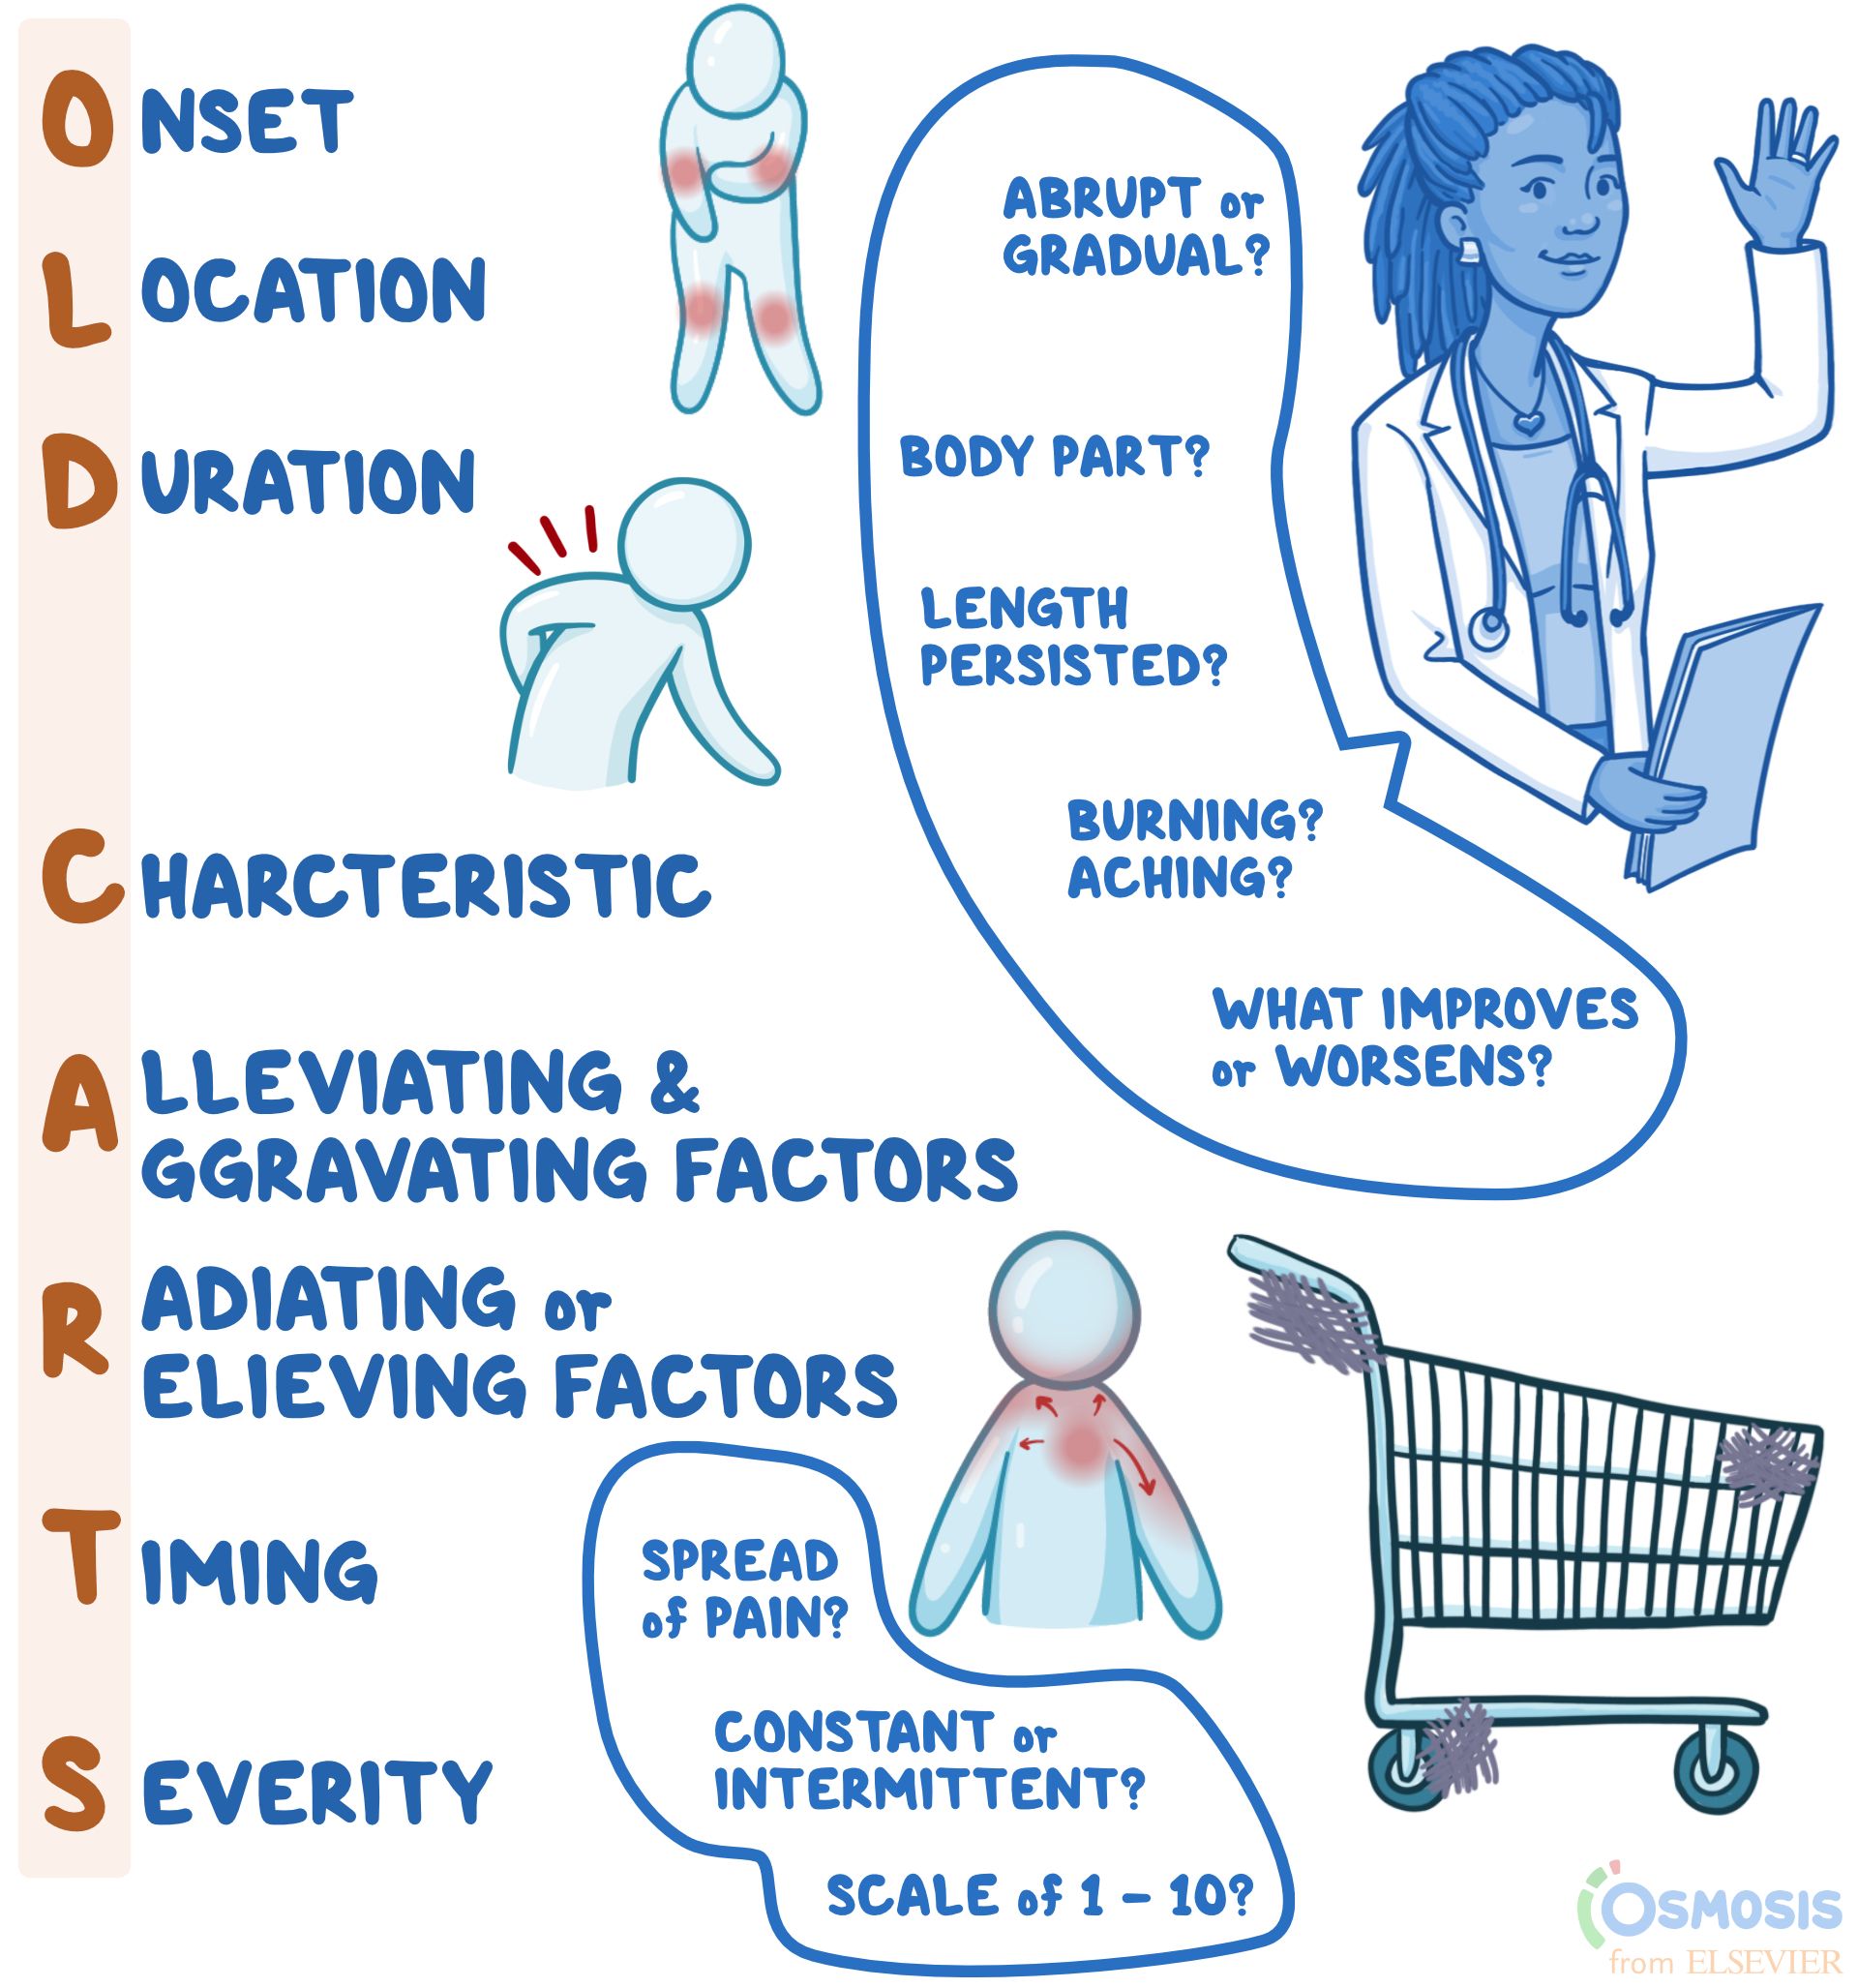
"OLD CARTS" is a mnemonic device that assists clinicians in remembering the pertinent questions to ask while assessing an individual’s present illness. When a person presents to their clinician with complaints of a new or reoccurring medical problem, the clinician may use "OLD CARTS" as a structured guideline and framework from which they will ask questions and collect information before they perform a physical exam. Most commonly, "OLD CARTS" can be utilized for a patient who is experiencing pain, however, this mnemonic can be used as a framework for any presenting symptom. 

OLD CARTS mnemonic illustrated in blue lettering vertically on the left-hand side.

What is a history of present illness?

A history of present illness, abbreviated HPI, refers to the description of an individual’s current health complaint, typically described in chronological order from the onset of their first sign and symptom to the present, defined as the moment they are sitting in front of the clinician. It is a narrative written in full-sentence format by the clinician that provides the necessary information for the clinician to generate differential diagnoses, guide medical-decision making, investigate the problem, and ultimately, provide the proper treatment. 

Excited Mo character in scrubs
Join millions of students and clinicians who learn by Osmosis!
Start Your Free Trial

What does the “O” in “OLD CARTS” mean?

The O in OLD CARTS means onset, indicating when and how the complaint began. For example, the clinician may ask if the pain has been present for hours, days, months, or years as well as if the pain occurs abruptly or gradually. 

What does the “L” in “OLD CARTS” mean?

The “L” in “OLD CARTS” means location. This refers to where the pain is, including which specific body part (e.g., head, arm, leg, abdomen) and if the pain is isolated to one specific area (e.g., headache isolated to one side of the head, or abdominal pain of the right lower quadrant). 

What does the “D” in “OLD CARTS” mean?

The “D” in “OLD CARTS” means duration. This refers to how long or how often the complaint occurs. For example, the pain may last for minutes, hours, or days at a time.

What does the “C” in “OLD CARTS” mean?

The “C” in “OLD CARTS” means characteristic. The clinician may ask the individual to describe their pain using words such as achy, dull, stabbing, sharp, throbbing, squeezing, itching, or burning.

What does the “A” in “OLD CARTS” mean?

The “A” in “OLD CARTS” means alleviating and aggravating factors. The individual may be asked if they did anything to help alleviate the pain, such as taking medications or resting. If they did try home remedies, it would be helpful to know if they improved the symptom. The clinician may also ask if anything worsens the pain, such as changing body position, walking up stairs, or eating.

What does the “R” in “OLD CARTS” mean?

The “R” in “OLD CARTS” means radiation, which refers to whether the pain travels to other parts of the body or whether it is isolated to one region only. “R” in “OLD CARTS” may also refer to relieving factors, or activities or treatments that reduce the pain. The mnemonic may vary slightly depending on the source.

What does the “T” in “OLD CARTS” mean?

The “T” in “OLD CARTS” means timing. This refers to if the pain is constant and experienced at all times, or if it is intermittent, meaning it comes and goes. If the pain is constant, the clinician might ask if the severity fluctuates throughout the day, which is referred to as waxing and waning pain. Meanwhile, if the symptom is intermittent in frequency, clinicians might ask how many times a week, month, or year it occurs. 

What does the “S” in “OLD CARTS” mean?

The “S” in “OLD CARTS” means severity. For pain specifically, people are typically asked to rank their level of pain from one to ten, with ten being described as the worst pain they have ever experienced. Other questions to help gauge severity can include asking how the complaint interferes with day-to-day life or how bothersome the complaint is to the individual. 

What are the most important facts to know about the “OLD CARTS” mnemonic?

“OLD CARTS” is a mnemonic device used by providers to guide their interview of a patient while documenting a history of present illness. The letters stand for onset; location; duration; characteristic; alleviating and aggravating factors; radiation or relieving factors; timing; and severity. What each letter stands for may vary slightly depending on the source of the mnemonic. Onset refers to when the symptom, for example pain, first began and whether it was abrupt or gradual; location refers to the body part(s) affected; duration refers to the length of time the symptoms have persisted; and characteristic refers to the individual’s description of the symptoms (i.e., burning, aching, sharp). Alleviating and aggravating factors are factors that improve or worsen symptoms, respectively; radiation refers to whether there is any spread of pain; timing refers to whether the pain is constant or intermittent; and lastly, severity is typically ranked on a scale of one to ten, with ten being the most severe. When used to guide documentation of an HPI, the mnemonic “OLD CARTS” can make patient evaluation and management more concise and efficient. 

Wednesday 24 August 2022

Physical health assessment

 Physical Health Assessment: Methods and Steps (theworldbook.org)


The Four Methods of Health Assessment

The four basic methods or techniques for physical health assessment are:

  1. Inspection,
  2. Palpation,
  3. Percussion and
  4. Auscultation. 

    3 Steps of Health Assessment


  1. A complete medical history,
  2. A general survey and
  3. A complete physical assessment.

1. A Complete Medical History


History taking is the first step of Physical Health Assessment. The general framework for history taking is as follows:

  • Presenting complaint.
  • History of presenting complaint, including investigations, treatment, and referrals already arranged and provided.
  • Past medical history: significant past diseases or illnesses, surgery, including complications, trauma.
  • Drug history: now and past, prescribed and over-the-counter, allergies.
  • Family history: especially parents, siblings, and children.
  • Social history: smoking, alcohol, drugs, accommodation and living arrangements, marital status, baseline functioning, occupation, pets, and hobbies.
  • Systems review: cardiovascular system, respiratory system, gastrointestinal system, nervous system, musculoskeletal system, genitourinary system

2. A General Survey

After collecting the health history and before going through the complete head to toe examination, some information or baseline data is collected which is called a general survey.

The general survey includes the person’s weight, height, body build, posture, gait, obvious signs of distress, level of hygiene and grooming, skin integrity, vital signs, oxygen saturation, and the person’s actual age compared and contrasted to the age that the person actually appears like.

For example, does the person appear to be older than his actual age? Does the person appear to be younger than his actual age?

3. A Complete Physical Assessment

A thorough physical assessment consists of the following:

  • Vital Signs: The pulse, blood pressure, body temperature, and respiratory rate are measured.
  • The Assessment of The Thorax and Lungs Including Lung Sounds: The size, symmetry, shape, and for the presence of any skin lesions and chest movements are observed. As well the breath sounds are observed and documented.
  • The Assessment of The Cardiovascular System Including Heart Sounds: By listening to the heart sound it is observed that the heart is normal or not.
  • The Assessment of The Head: The head movement is visualized over here.
  • The Assessment of The Neck: The neck is visualized and the thyroid gland is inspected for any swelling and also for normal movement during swallowing.
  • The Integumentary System Assessment: The color of the skin, the quality, distribution and condition of the bodily hair, the size, the location, color and type of any skin lesions are assessed and documented, the color of the nail beds, and the angle of curvature where the nails meet the skin of the fingers are also inspected.
  • The Assessment of The Peripheral Vascular System: The peripheral veins are gently touched to determine the temperature of the skin, the presence of any tenderness, and swelling.
  • The Assessment of The Breast and Axillae: The breasts are visualized to assess the size, shape, symmetry, color, and the presence of any dimpling, lesions, swelling, edema, visible lumps, and nipple retractions. The nipples are also assessed for the presence of any discharge, which is not normal for either gender except when the female is pregnant or lactating.
  • The Assessment of The Abdomen: The abdomen is visualized to determine its size, contour, symmetry, and the presence of any lesions.
  • The Assessment of The Musculoskeletal System: The major muscles of the body are inspected by the nurse to determine their size, and strength, and the presence of any tremors, contractures, muscular weakness and/or paralysis. All joints are measured for their full range of motion.
  • The Assessment of The Neurological System: The Balance, gait, gross motor function, fine motor function and coordination, sensory functioning, temperature sensory functioning, kinesthetic sensations, and tactile sensory-motor functioning, as well as all of the cranial nerves, are measured.
  • The Assessment of The Male and Female Genitalia and Inguinal Lymph Nodes: The skin and the pubic hair are inspected. The labia, clitoris, vagina and urethral opening are inspected among female clients. The penis, urethral meatus, and the scrotum are inspected among male clients.
  • The Assessment of The Rectum and Anus: The rectum, anus and the surrounding area is examined for any abnormalities.

auscultation

 (6) SAM Online® Auscultation Training System by Cardionics - YouTube